Reassign User Account
The following information is for Admin users only.
This feature allows you to reassign a user’s account settings to another user. So, if one employee leaves the organization, their phone number, caller ID, device lines, IVR/Auto-Attendant references, etc. can be reassigned to their replacement.
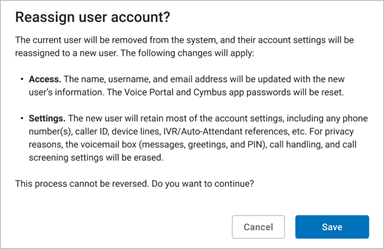
When a user account is reassigned, the current user is removed from the system and their account settings are reassigned to a new user. Not all settings will make the switch, though. Here's how it works:
New User Default Settings
The name, username, and email address are updated with the new user's information. For privacy reasons, the following features and settings are reset to default:
Account History
Call History
Call Handling
Call Screening
Voicemail greetings, messages, and PIN
Features and Settings That Switch
The previous end user's features and settings will be assigned to the new user, including but not limited to:
Calling plan assignments (not minutes used)
Product tier
Voice Portal access
End user role (Admin or Limited)
Caller ID phone number and settings
Device lines assigned to the user
Phone numbers routing to the user
Cymbus UC device lines
Extension number
Language
Time zone
Shared lines, speed dials, and BLFs owned by or reference the user
Paging and Pick Up Groups to which the user belongs
Queues to which the user belongs
IVR/Auto-Attendant references that point to the user, their device lines, or their voicemail box
SIP trunk overflow routing (pointed at the user or their voicemail)
Steps to Reassign an End User Account
Go to Users and edit the user whose account you want to reassign.
In the user's Settings tab, scroll down to the bottom and click [Reassign].
If you don't see this button, you may need additional permissions to use this feature. Please contact Customer Support for assistance.

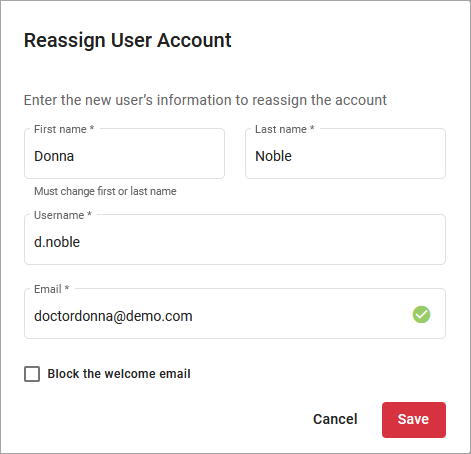
Enter the new user's name, username, and email address. If you do not want the user to access their account yet, check Block the welcome email. Then click [Continue].
Read the warning message carefully to understand what will and will not be switched. If you still want to proceed with the reassignment, click [Save].
The previous user's account settings have been successfully reassigned to a new user. Unless the welcome email was blocked, the new user can click the link in that email to create a password and log in to the Voice Portal.
Note
Please remind the new user to configure their own call handling , call screening , and voicemail settings.
End User Access
Admin end users, including Account Managers, can reassign users on their account in the end user portal, but you'll need to give them permission first.
Go to Account > Settings > User Access.
Scroll to Voice Portal Permissions.
For Reassign end users, select Allow editing.
Click [Save].