Add Short Dial
Follow the steps below to add a short dial to the account:
Go to Business Cloud > Short Dials.
Click [+ Short Dial] on the right.
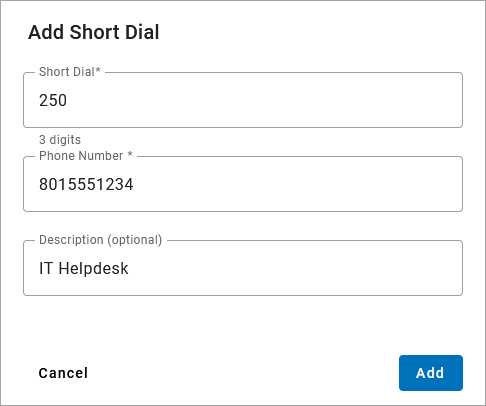
In the Add Short Dial popup, enter the following information:
Short Dial: The number that will be dialed. It must be the same length as extensions on the account (3–6 digits), as indicated by text below the field.
Phone Number: The phone number the short dial will route to, without any spaces or special characters. For example, 18015551234.
Description: A brief description for the short dial, such as the name of the destination (optional). For example: IT Helpdesk.
Click [Add]. The short dial is added to the account.
Add Short Dial Range
A short dial range is used to assign short dials to sequential phone numbers. For example, if the starting number is (214) 555-8536, and the range is 2000 to 2004, five short dials will be set up as follows:
(214) 555-8536: 2000
(214) 555-8537: 2001
(214) 555-8538: 2002
(214) 555-8539: 2003
(214) 555-8540: 2004
This is most frequently used to set up extension dialing to an on-site PBX. For example, if an account has a PBX with sequential phone numbers ending in 1000–1250, they can add a short dial range of 1000 to 1250 to match the last 4 digits of the phone numbers.
Short dials can be mapped to any on- or off-net phone number, so be sure that you own the complete range of sequential phone numbers to avoid routing calls to an unknown third party.
Follow the steps below to add a short dial range:
Go to Business Cloud > Short Dials.
Click the menu at the top right and select Add Range.
In the Add Short Dial Range popup, enter the starting and ending short dials. The range must have less than 250 numbers. In the example below, 25 short dials will be created starting with 200 and ending with 225.
Enter the starting phone number.
Click [Add]. The short dials are added to the account.
Add Description
To add a description to any of these short dials, click the pencil icon on the right, enter a description, then click [Save]. This step is optional. See Manage Short Dials for details.
Import Short Dials
Rather than adding one at a time, you can migrate short dials from a previous account or provider using a CSV file. Up to 250 short dial numbers can be imported to the account at a time.
Imports are strictly additive; they cannot replace or edit short dials that are already on the account.
Create CSV
Create a CSV file with columns in the following order: Short Dial, Maps to, Destination, and Description.
Alternatively, export a list (CSV) of your current short dial numbers to use as a template. Remember to remove all existing numbers before importing it to the account.
Fill out the fields for every short dial you want to add, then save the file.
Short Dial: The code that will be dialed. It must be the same length as extensions on the account (3–6 digits).
Maps to: PHONE_NUMBER
Destination: The phone number this code will route to, without any spaces or special characters. For example, 18015551234.
Description: A brief name or description, such as the name of the destination. For example: IT Helpdesk. This field is optional.
Save the completed spreadsheet as a .csv file.
Import File
Go to Account > Short Dials.
Click the menu on the right and select Import CSV.
Drag and drop the file into the upload area or click the link and select the file from your computer.
Click [Import] to apply the changes to the account.
Troubleshooting
Multiple safeguards are in place to prevent short dials from interfering with other features on the account. If you get an error when adding a short dial, the error message should tell you the problem to correct. Once you fix it, try adding the short dial(s) again.
The most common errors include:
Short dial overlaps with an existing short dial or extension.
Short dial begins with an N11 service number, such as 311, 411, 911, etc.
Short dial numbers are too long or too short; they must be the same length as extensions on the account.