Change Phone Number Destination
When a phone number is added to the account, a destination is assigned to direct callers to the right place. The destination can be changed at any time, such as when launching a new auto-attendant, or reassigning a phone number from one user to another.
To change the destination of a phone number:
Go to the Phone Numbers page.
Locate the phone number you want to modify and click the
 destination icon on the right.
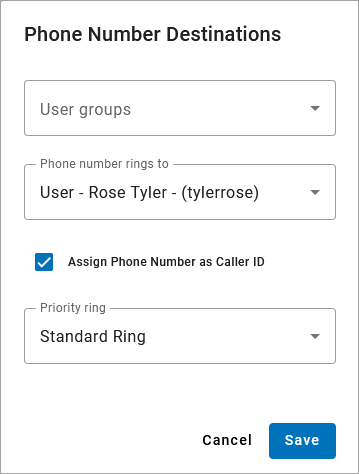
Below Phone Number Destinations, fill out the following:
User Groups: Select a group to narrow the Phone Number Rings To options below to only those users (optional) or leave it blank to show all possible destinations.
Phone Number Rings To: Select a new destination. Supported destinations include auto-attendants, hunt groups, queues, users, and virtual faxes.
Assign Phone Number as Caller ID: If the destination is to a user, choose whether to assign this phone number as the user's caller ID. If unchecked, caller ID will be sent as .
To assign a different number as the user's caller ID, go to the user's Calls tab and select a number from the Caller ID field.
Priority Ring: Select a priority ring tone (optional).
Click [Save]. The changes will be applied immediately.

Note
If you don't have access to the Phone Numbers page, please contact Customer Support for assistance.