Auto-Attendant
The following information is for Admin users only. See User Access Levels to learn more.
Managing inbound calls is a crucial part of how an organization handles everyday business. Auto-attendants enable identification, segmentation, and routing of callers to the most appropriate agent within your team. It's a simple, effective, and completely customizable tool which will significantly reduce costs and increase efficiency within any company.
Auto-attendants are easy to build and modify. The editor lays out your routes into clear columns and rows so you can see exactly what you're building and how it all fits together. Changes are saved in real time, so you won't lose any edits — even if you close the window. Incomplete auto-attendants will also be saved so they can be edited and completed later.
Manage Auto-Attendants
In
, you can see all the auto-attendants on the account, including the assigned phone number(s), last modified date, and status. You can build and keep as many auto-attendants as needed, and an existing Auto-Attendant can be duplicated so it doesn't have to be rebuilt just to make a small change for a specific situation. Changes are saved in real time, so you can start building now and come back to finish it later.If you don’t see Auto-Attendant in the menu, please contact Customer Support.
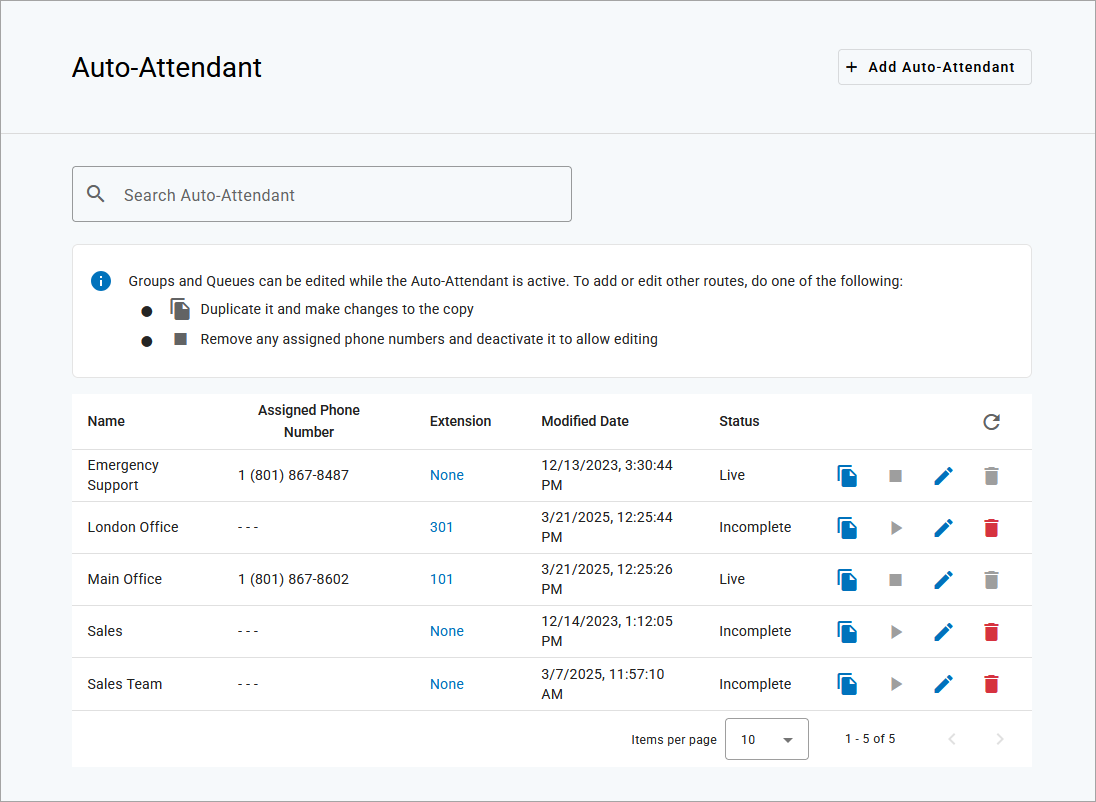
Field | Description |
---|---|
[+ Add Auto-Attendant] | Start creating a new auto-attendant. The builder will open in a new window, so you can look back at the auto-attendant list if you need to reference it. See Auto-Attendant Setup for details. |
Name | The name of the auto-attendant. If a name wasn't saved, it will be named "untitled auto-attendant" by default. |
Assigned Phone Number | The phone number(s) directed to this auto-attendant. A phone number must be assigned before calls can be directed through the auto-attendant. If this is blank, contact Customer Support for assistance. |
Extension | The extension (optional) assigned to the auto-attendant, which allows users to transfer calls back to the main menu to reach a different department. Click this field to add or modify the extension. |
Modified Date | The last date the auto-attendant was modified: month, day, year, time. |
Status |
|
Tools
Hover over an auto-attendant to see the tools on the right. The tools available are different for each status. For example, an incomplete auto-attendant cannot be launched, and live auto-attendant cannot be deleted.
Field | Description |
---|---|
Delete | Permanently delete this auto-attendant. This cannot be undone. Before deleting an auto-attendant, contact Customer Support to redirect the phone number, so calls aren't sent to an attendant that no longer exists. |
Duplicate | Active auto-attendants cannot be edited, but you can duplicate it and make changes to the copy. The duplicate feature makes it easy to create a new auto-attendant based on an existing one. Extensions cannot be duplicated. The extension must be removed from the original before it can be assigned to the duplicate. See Edit Auto-Attendants for details. |
Activate | When the status is Ready to Activate, click the Activate icon to make the auto-attendant available as a destination in the Phone Number menu. |
Deactivate | Deactivate the auto-attendant and downgrade the status to Ready to Activate. To deactivate a Live auto-attendant, unassign the phone number first; the status will be downgraded to Activated, Assign TN. ImportantThe phone number must be unassigned before the auto-attendant can be edited. Please contact Customer Support for assistance. |
Edit | Make changes to an auto-attendant. For auto-attendants that are Live or Activated, only Group routes can be edited; all other routes are view-only. |
Routes are the key components of an auto-attendant and play an important role in the caller's experience. When used correctly, they can guide the caller to their destination and provide alternative options if the destination is not available. Review each route below to learn more.
The Schedule route allows users to set their phone system to direct incoming calls to different destinations depending on when they call in, such as business hours, lunch hours, holidays, after-hours, etc. The option to create a new schedule is available when adding a new auto-attendant or editing an existing one.
A schedule requires at least one rule, but you can add as many as you need. Calls will be routed to the first rule that matches the time of the incoming call, based on the priority order in which the rules are set. To change the order of your rules, click the icon to the right of the rule and drag it to the correct position.
Schedule Name. Enter a name for this schedule (20 character max).
Time Zone. Select which time zone should be applied.
Rule Name. Enter a name for this rule.
Weekly/Custom. Choose a rule type: Weekly (recurring) or Custom (one-time).
Day/Date. For a Weekly rule, select the days of the week that this rule applies to. For a Custom rule, choose the date (you can choose more than one date, but not a range.)
Time. Enter the start and end times. You can type it in or click the clock icon on the right to use the drop-down menu (Chrome only).
For a Weekly rule, you can split the rule into different times during the day. Click + Add Time Range, then enter the other time.
Save. When you're done, click the checkmark in the top right.
If needed, click [+ Add Rule] to add another rule to this schedule.
When you're done adding rules to the schedule, click [Save].
Weekly | Custom |
Delete a Rule
To delete a rule, click the trash icon. The rule will be crossed out, but if you change your mind, it can still be restored or edited until the schedule is saved. Once you save the schedule, though, any deleted rules will be deleted permanently.
Save
After you set up and save your schedule, the routes are added to the auto-attendant builder canvas. Click the Add icon to add another route to the route.
By default, an "All other times" route will be added to determine where calls are routed during times that aren't specified by a rule.
A Menu route directs the caller to a message and DTMF (Dual-tone Multi-Frequency, commonly referred to as touchtones) options for call routing based on the key dialed.
Menu Name
First, enter a name for the menu, then continue to upload your prompts.
Prompts
Prompts are the recorded audio files that callers hear before upon entering the menu.
The Intro Prompt plays right before the Menu prompt. Because it's a separate audio file, it can be easily switched out for various circumstances, such as announcing seasonal sales or temporary business hours. This prompt is optional.
The Menu Prompt tells callers how to navigate the menu options. For example: "Thank you for calling Acme Corp. Press 1 for Sales, 2 for Support, or 3 for Billing." This prompt is required.
For each prompt, click the menu and select a media file from the library.
To confirm you have the right one, you can play the file in your browser or download it to your computer.
If the file you need isn't listed, you can upload or record a new one in Media Files.
Allow Barge-In
Toggle on to allow callers to interrupt the Intro prompt by dialing an option (DTMF input) before they hear it.
Allow Extension Dialing
Toggle on to allow callers to dial their party's extension while the menu options are still playing. After dialing, there is a two second delay before the call is routed.
If "Allow Barge-in" is also enabled, callers can interrupt the Intro prompt as well. Because an extension may start with the same number as a menu option, there is a two second delay after a number is dialed before the call is transferred. If the dialed extension is invalid, the caller will hear “invalid extension,” and the call will end.
Menu Options
Add DTMF (touchtone) options (0–9, *, #). Each option will need a name and a completed route.
|
Failure Routing
Field | Description |
---|---|
Menu Timeout | Enter the number of seconds delay before directing the call into the failure route. (1–999) |
Max Invalid Selections | Enter the number of invalid DTMF (touchtone) selections that will be allowed prior to directing the call into the failure route. |
Invalid Prompt | Upload a WAV or MP3 file under 5 MB that the caller will hear after dialing an invalid DMTF option (required). Example verbiage: "The number you entered was invalid. Please try again." |
When you're done configuring the menu, click [Save]. The menu will be added to the auto-attendant builder canvas.
Dial by Extension, or Extension Dialing, allows a caller to interrupt an auto-attendant's Menu Prompt by dialing their party's extension, which means callers don't need to wait for the menu to stop playing before they can make a selection.
This feature can be enabled in the Menu route by toggling on "Allow Extension Dialing." Additionally, if "Allow Barge-In" is enabled, callers will also be able to interrupt the intro prompt.
Once an extension is dialed, the call will be directed to that extension and will follow the call handling rules for that user.
Because an extension can start with the same number as a menu option (for example, 2001), there is a 2-second delay after a number is dialed before the system will apply the selection. However, if the caller dials the maximum number of digits allowed for an extension on that account, the call will be sent immediately.
Invalid Selections
If the caller dials an invalid extension, they will hear "invalid extension", then the call will be disconnected.
If the caller dials more than one digit but less than an extension, they will hear the "Invalid Prompt" message and the menu will repeat.
Once the caller reaches the "Max Invalid Selections" limit, the call will be disconnected.
Using the Message route, the caller will hear a prerecorded message.
Enter a name or description for the message that will be displayed in the auto-attendant editor, then click the drop-down menu and select a media file from the library.
To confirm you have the right one, you can play the file in your browser or download it to your computer.
If the file you need isn't listed, you can upload or record a new one in Media Files.
A Group route, also known as a hunt group, allows a call to ring to multiple users (not devices). Rather than following each user's call handling rules, the group follows its own ring strategy: Simultaneous, Sequential, or Round Robin. The first user to answer will get the call. If no one answers, the call will follow the group's failure route.
Notice
Group routes are the only components of a live auto-attendant that can be edited. This means you can update the Night Forwarding number, log users in or out of a group, or change any other setting within the route as needed. For all other edits, see Edit an Auto-Attendant.
Field | Description |
---|---|
Group Name | Enter a name to identify this group. |
Custom music on hold | The caller will hear hold music until the call is answered. Click the menu and select a custom Music On Hold file from the Media Files library to apply it to this group. To be sure you’ve got the right file, click Play on the right. If a custom file is not selected, the caller will hear the Music On Hold set for the account. |
Toggle on to allow calls to enter a call queue. | |
Toggle on to allow the auto-attendant’s Group name to be included as part of the caller ID, so the user who receives the call knows where it originated from. Example: Sales Jane Smith. | |
Choose whether to allow users in an auto-attendant group to turn calls on and off via star code. | |
Choose how incoming calls will ring to users in the group. | |
Choose if users in the group can log in and out via star code. |
Call Queuing
Long calling queues have an undeniably negative impact on your customer’s experience. For 66% of callers, two minutes on hold is their breaking point. This feature helps your business pre-set and manage large call volumes without increasing operational costs.
When a call is in the queue, the caller will hear hold music while they wait for the next available representative. Hold music is set at the account level, not at the queue level, meaning custom music cannot be set for each individual queue.
To configure a queue, open the Group route and toggle on Allow Call Queuing, then enter the following information:
Max # of Calls. Enter the number of calls that can be in the queue at one time (1–50).
Max Time (Minutes). Enter the number of minutes that a call is allowed be in the queue (1–360). Once the max time is reached, the call is sent to the failure route.
Ring Timeout (Seconds). Enter the number of seconds a call will ring a user (sequential and round robin) or group (simultaneous) before it is pushed back to the front of the queue (5–120). Keep this setting low to ensure calls are answered quickly.
Notice
If a Group is set to ring all devices simultaneously and a phone becomes available after the call is already in the group, the phone will ring but not until the Ring Timeout setting is met.
Use Group Name in Caller ID
This feature prepends the Group name to the caller ID, so the user who receives the call can identify where it originated. This is especially helpful for users who are part of multiple auto-attendant groups.
For example, if a caller listens to the auto-attendant menu and presses 2 for Sales, when the call is delivered to a user, the caller ID will show the group name before the caller's name and phone number: From: Sales JANE SMITH 18015551234.
If a call is routed through multiple groups, only the most recent group name will be displayed. There are no character limitations for the Group name, but a shorter name will allow more to be shown on the device screen.
Log in to the account and go to Auto-Attendant.
Create a new auto-attendant or edit an existing one.
Add or edit a Group route in the auto-attendant path.
Enable Use Group Name in Caller ID.
Make any other changes to the route as needed, then scroll down and press [Save].
Night Forwarding
Night Forwarding, also known as Night Mode, allows users in an auto-attendant group to turn their calls on in the morning and off at night by dialing a star code.
When enabled, incoming calls to the auto-attendant group are redirected to a preconfigured phone number, which can be to another group, a voicemail box, a user, or an off-net number (like the night manager's cell phone). And because it's controlled by a star code, each group can manage it independently.
Log in to the portal and go to Auto-Attendant.
Add or edit a Group route in the auto-attendant path.
Under Night Forwarding, enter the following:
Forwarding Number. The on- or off-net phone number calls will be redirected to.
Description. A description to identify the phone number (optional).
Group Number. A three-digit identifier that will be used with the star code to enable or disable Night Forwarding.
Scroll down and click [Save].
Finish customizing the auto-attendant, then activate it to make it live.
Now users assigned to the group can dial the star code to enable or disable forwarding to this group.
Shared Group Numbers
The group number does not have to be unique. When the same number is assigned to multiple groups, enabling/disabling Night Forwarding for one will enable/disable it for them all. This strategy is useful when multiple teams are on the same schedule, or one team is assigned to answer calls for multiple groups. However, to allow each group to manage their Night Forwarding setting independently, all auto-attendant groups must have a unique group number.
Enable or Disable Forwarding
Only a user assigned to the auto-attendant group can enable or disable Night Forwarding for that group. However, if multiple groups are assigned the same group number, the user who enables/disables it only has to belong to one of the groups.
A user in the auto-attendant group will dial the Group Forwarding star code + the group number.
For example, if the star code is 65 and the group number is 102, the user will dial *65102.
Follow the audio prompts:
Press 1 to turn on Night Forwarding.
Press 2 to turn off Night Forwarding.
Press 3 to set the Night Forwarding number.
Note
If calls are in the queue when Night Forwarding is enabled, those calls will remain in the queue until answered, and all new calls to the queue will be forwarded.
Change Forwarding Number
A group user can change the forwarding number by dialing the star code and pressing 3. Alternatively, an Admin user can change the forwarding number in the editor:
Open the Auto-Attendant editor for the one you need to modify.
Edit the Group route and change the Night Forwarding phone number.
Click [Save] to apply the new number.
Check Forwarding Status
To find out if Night Forwarding is currently enabled for a group, open the auto-attendant in View Only mode, then go to the Group route. The Night Forwarding flag will say either Inactive or Active.
Tip
If you're looking for a way to customize call routing rules for specific days and hours of operation, try the Scheduling route instead.
User Ring Strategy
Choose if how incoming calls will ring to users in the group:
Simultaneous: Rings all devices for users in the group at the same time; the first user to answer gets it. Additional settings are required.
Sequential: Rings one device in the group at a time in a specified order until the call is answered.
Round Robin: Rings the next user in the group based on which user received the last call. This ensures that all users in the group receive an equal number of calls.
Longest Idle. Rings the user who has been idle (not on a call) the longest, to evenly distribute incoming calls among users in the group.
Simultaneous Ring
After selecting Simultaneous as your ring strategy, remember to configure these additional settings:
Ring Timeout: Enter the number of seconds for the call to ring before the unanswered call follows the failure route.
Ring next available line when user is busy: Toggle on or off.
Enabled: Incoming calls will ring all users, regardless of their call status.
If the user has a single line with Call Waiting enabled, they will hear the Call Waiting tone for the call on the same line as the existing call.
If they have multiple lines for their number and are busy, the call will ring on an idle line.
Disabled: Incoming calls to the group will not ring to users who are busy.
User Log In/Out
Enter your group users, their ring timeout settings, and specify whether they can log in or out of the group by dialing a star code.
Keep Users Logged In (or Don't)
Groups can function in two ways: keep users always logged in or allow users log in and out as needed. Choose the option that works best for this group:
Enabled: Users will remain logged in to the group and will receive calls according to the auto-attendant's schedule. They cannot use the star code to log out.
Disabled: Users assigned to this group can log in and out by dialing the Group Log In/Out star code + group number from their device. Additionally, you can open the auto-attendant editor to see who's logged in or out, and even change the user's status on their behalf.
Note
Ask Customer Support about getting the Group Log In/Out star code, so you can take advantage of this feature.
Add Users
To add a user to the group, click the User menu and select their name from the list. To add additional users, click [+ Add User]. Add as many users as required.
Group Filter. To narrow the list of options to users in a specific User Group , select the group name in the filter above (optional).
Timeout. For each user in a sequential or round robin ring strategy, also specify the number of seconds calls will ring each user before moving on to the next.
Logged In. The checkmark indicates the user's login status. To log a user in, check the box. To log a user out, uncheck the box.
Delete. To remove a user from the list, click the icon on the right.
When you're done, click [Save].
The User route directs calls to a single user, whose personal call handling settings will then apply as normal (unless "Send calls directly to voicemail" is selected).
Field | Description |
---|---|
User menu | Choose which user the incoming call will be directed to. |
Send calls directly to user's voicemail | Toggle on to bypass the user's call handling rules and routes the call directly to the user's assigned voicemail box. |
The Forward to Phone Number route directs calls to an on- or off-net phone number. Select the country code from the menu on the left, then enter the phone number and a description (optional) in the fields to the right.
The Directory route allows the caller to dial a user in the directory using text to speech. When the caller reaches this point, they will hear, “Dial by last name” or “Dial by first name.” The caller will dial 3 or more characters of the user’s name and press #. If there is more than one matching user, the caller will select a user from a list of options.
Dial by…
Choose if callers will dial by the user's last name or first name.
Custom Audio
Optionally, select custom audio prompts to give callers custom guidance in the directory. For Intro Prompt and/or Invalid Selection, click the drop-down menu and select a media file from the library.
To confirm you have the right one, you can play the file in your browser or download it to your computer.
If the file you need isn't listed, you can upload or record a new one in Media Files.
If custom audio is not used, the caller will hear the default "Dial by" prompts.
Failure Routing
A failure route is required in case the caller is unable reach the user they were looking for.
Field | Description |
---|---|
Timeout (Seconds) | Enter the number of seconds the call can be in the directory. (5–30) |
Max Invalid Selections | Enter the number of invalid selections the caller can try before the call is redirected to the failure route. (1–10) |
The Hang Up route terminates any call that reaches this point. Remember to click [Save] to keep this route.
A Reference route redirects the call to another route. When a change is made in the original route, any references that use it will also be updated.
Choose which route a caller will be redirected to once they reach this point in the route, then click [Save].