Holiday Troubleshooting
Auto-Attendant Schedules determine where to route calls based on the time and date of the incoming call. Previously, schedules were configured directly within auto-attendants, making it easy to see the relationship between each rule and the call flows. Now that schedules are managed separately, it can be harder to understand the impact—sometimes leading to unexpected routing issues.
For example, the most common issue seen in auto-attendants is that calls are not routing properly during scheduled holidays. There are two reasons this might happen:
The custom rule with holidays is listed after the rule for weekly business hours.
All day is enabled and Calls follow the "All other times" rule is selected.
This was the previous default setting and may not be what you intend. To route calls to the custom rule instead, select that option below and click .
Review Your Auto-Attendants
Double-check that your auto-attendants are configured to route calls exactly as you expect. A quick review today can prevent missed calls and confusion later.
List Custom Rules First
When a call reaches an auto-attendant schedule, it is routed to the first rule that matches the date and time of the call. If calls are following your standard business hours during holidays, your rules are probably out of order.
Check your auto-attendant schedules that are in use to make sure holiday rules are listed first. If they’re not, there are a few things you’ll need to do:
Update Schedules
Log in to the portal and go to .
Locate the schedule that needs to be updated.
If the usage count is zero (0), click
 Edit.
Edit.If the usage count is 1 or more, click
 Duplicate, then locate the copy and click Edit.
Update the name of the schedule, so you can differentiate between this and the original in a list. For example: Business Hours (NEW).
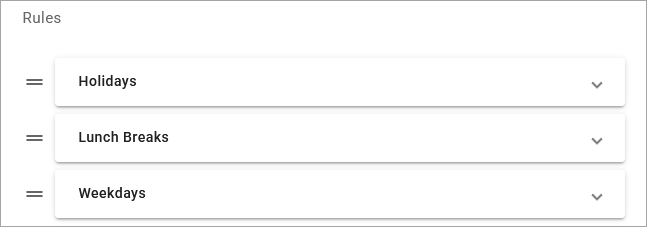
Scroll down to to see how each one is organized. Expand each rule to identify it’s set up as Weekly or Custom, then use the
 bars on the left to drag each rule into the correct position from most to least restrictive, with custom rules before weekly rules.
For example, if you have rules for standard weekly hours, lunch breaks, and holidays, holidays should be listed first. When a call comes in, the auto-attendant will first check to see if the date and time of the call is during a specified holiday, then it will check lunch hours, and finally it will check your weekly rules. If the date and time do not match any rule, the call is routed to the "All other times" rule.
All day
While you’re here, you may also want to check the “All day” setting to ensure calls will be routed as expected. However, settings within Date & Time periods can be modified while the auto-attendant is live, so you can check on it later.
Update Auto-Attendants
Once the schedule has been modified and saved, the new schedule must be assigned to the auto-attendant. However, Live and Activatedauto-attendants cannot be modified to avoid breaking the flow for active calls; so, you must duplicate the auto-attendant first and then rebuild the routes. See also: Edit Auto-Attendants
Duplicate. Copy the auto-attendant to enable editing.
To the right of the auto-attendant that needs to be updated, click
Duplicate. A copy will be made with “copy of” at the beginning of the title.Locate the “copy of” auto-attendant you just created, then click
Edit to open the builder.
Swap Schedules. Assign the new schedule to the auto-attendant.
In the top left of the builder, update the name to identify it as the new version.
Click the route in the builder, then select the recently updated schedule from the menu that appears on the right.
Click . All routes following the schedule, except for those following the All other times rule, will be cleared.
Rebuild. To the right of each rule, click
 Plus to add a new route, then rebuild the auto-attendant as you had it before. See Auto-Attendant Setup Guide and Auto-Attendant Routes Guide for more information.
Activate. Back on the Auto-Attendant page, locate the new auto-attendant and click
 Activate. The auto-attendant routes are now locked and cannot be edited.
Launch. To avoid breaking active call flows, we recommend performing this step after hours, when there are no calls in the auto-attendant.
Click ] to go to the Phone Numbers page.
Locate the phone number assigned to the original auto-attendant, then click
 Destination on the right and change it to the new auto-attendant.
Finally, click to go live.
Cleanup
Before you're done, clean up your auto-attendant list. Back on the Auto-Attendants page, locate the old one you just replaced, which should be in the Activated, Assign TN status. To permanently remove it from the list, click  Deactivate then
  Delete .
“All Day” Routing
For custom rules, when a period has All day enabled, the entire date (12:00 a.m. to 11:59 p.m.) is considered off-hours, and calls will be sent to the rule selected below.
Calls follow the "All other times" rule. Calls will be routed to the "All other times" route configured in the auto-attendant.
This rule is typically used to route calls when the date and time of the call does not match any defined rule in the schedule.
Calls follow this custom rule. Calls will be routed to the flow configured for this custom rule.
To route calls during specific hours only, toggle this off and enter the start and end times in the fields above.